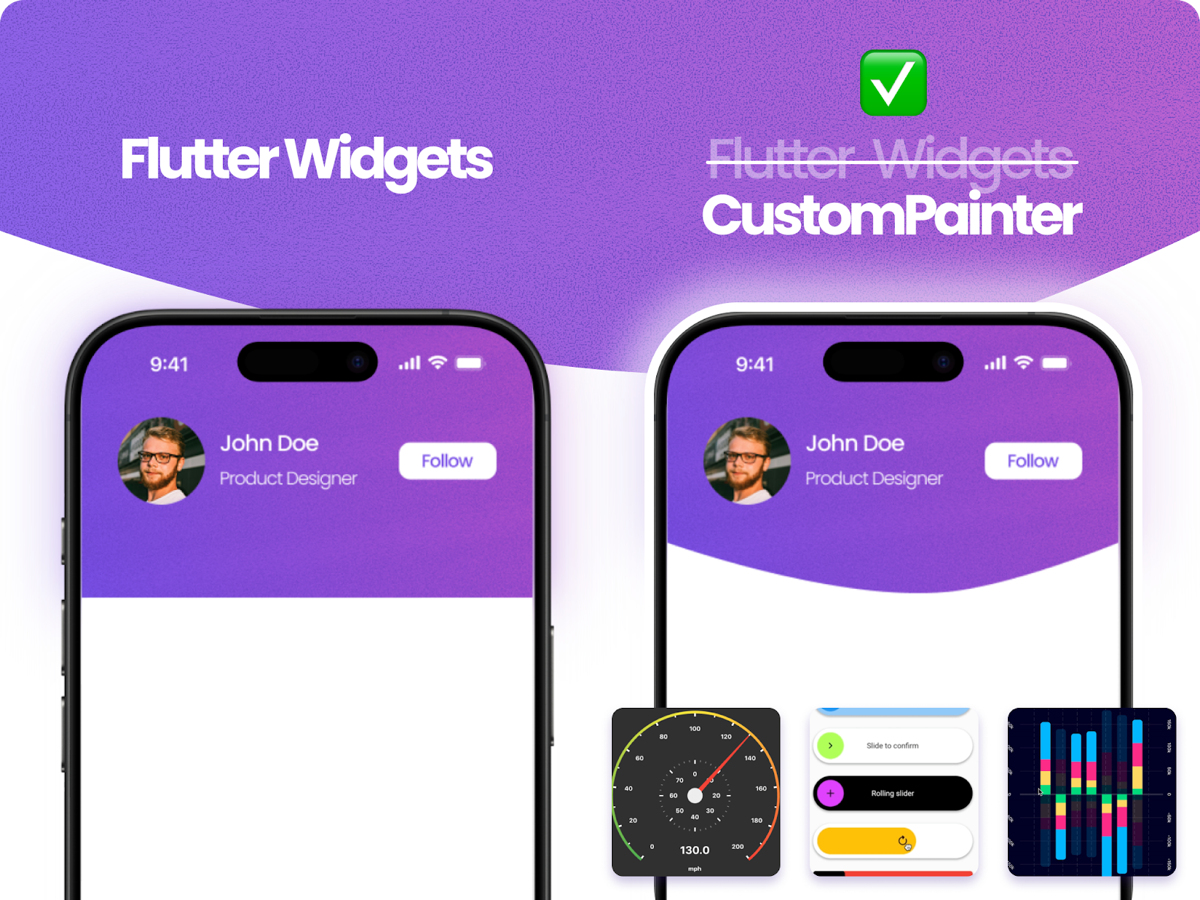
Have you ever looked at a design and thought, “That looks doable with standard Flutter widgets,” only for the designer to send over an update that turns everything upside down? Then the next revision arrives, and suddenly the background needs to feel “organic and irregular,” or the UI calls for a speedometer or custom data visualization.
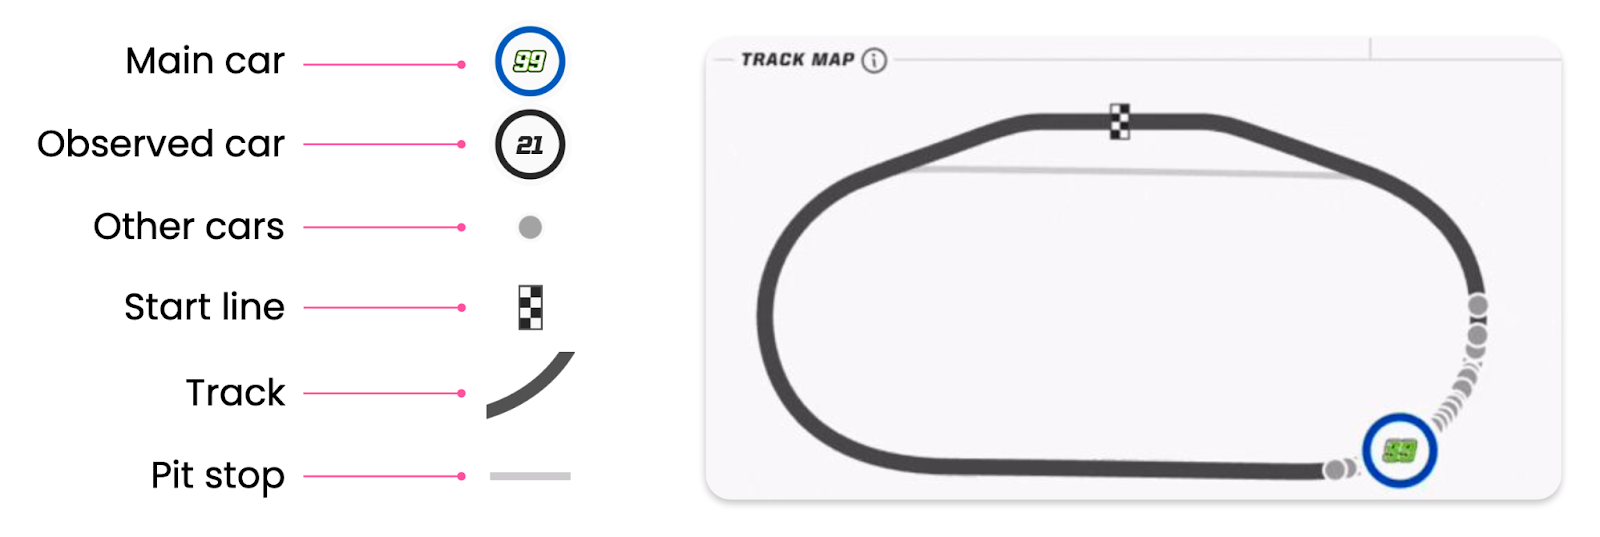
Before we get into how to tackle challenges like these, let’s take a look at what’s possible. Here’s a sneak peek at the final demo we’ll be breaking down in this post—a real-time racetrack animation built for a NASCAR team.
You might look at that and think there is no RaceTrack widget in Flutter. And you’d be right. Trying to build organic curves and real-time path animations with standard rows, columns, or stacks would be nearly impossible.
This is exactly where CustomPainter comes in. It allows you to break free from standard widget constraints and bridge the gap between complex design requirements and functional code.
In this post, we’ll dive into mastering CustomPainter, specifically focusing on drawPath and how to manipulate paths under the hood to build dynamic, high-performance UIs.
The Foundation: Flutter’s Rendering Pipeline
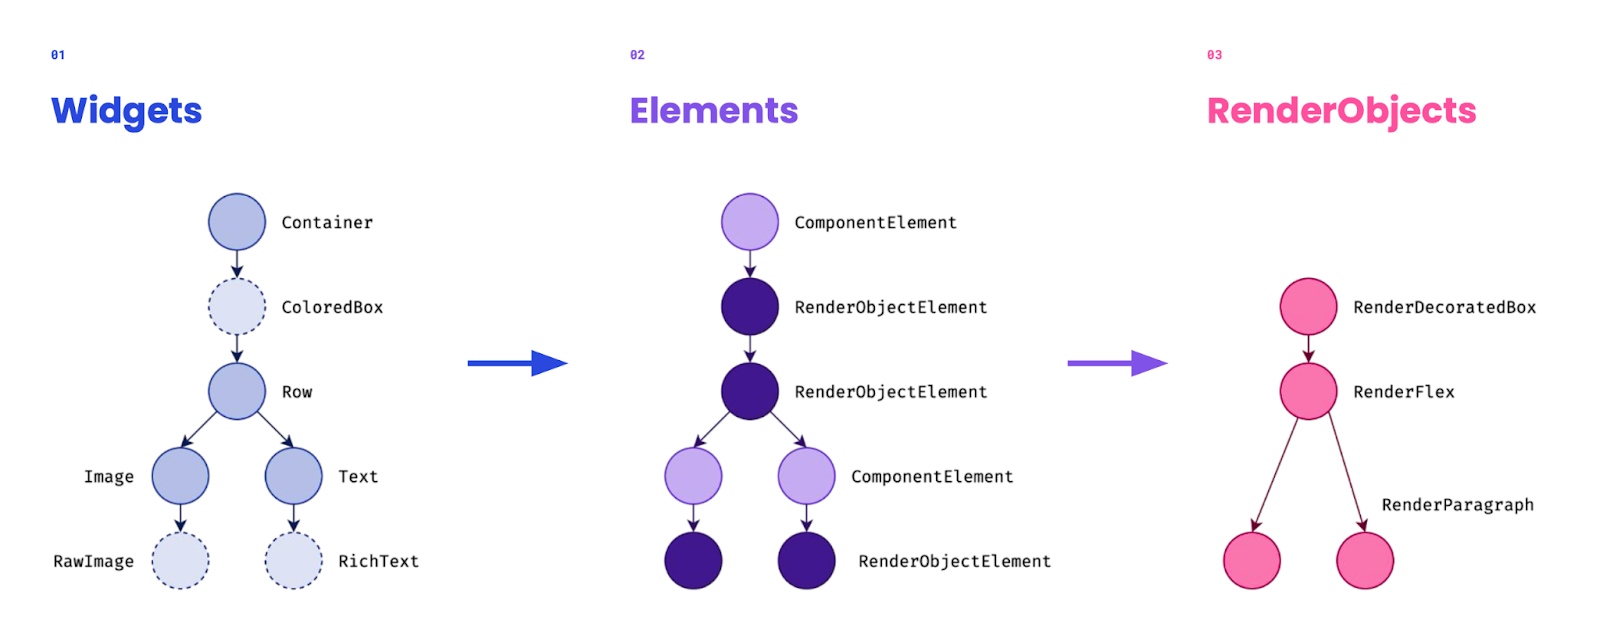
To understand why CustomPainter is so powerful, we need to look at what happens before a pixel hits the screen. Flutter relies on three main trees:
- The Widget Tree: This is the layer you interact with as a developer. Think of widgets as immutable blueprints or configuration files for your UI. They describe what the view should look like given the current state. Because they’re incredibly lightweight and cheap to create, Flutter can destroy and rebuild them frequently without performance issues.
- The Element Tree: The glue between widgets and rendering. Elements are mutable and manage the lifecycle of widgets to minimize expensive updates.
- The RenderObject Tree: The heavy lifters. These mutable objects handle layout, painting, and hit testing.
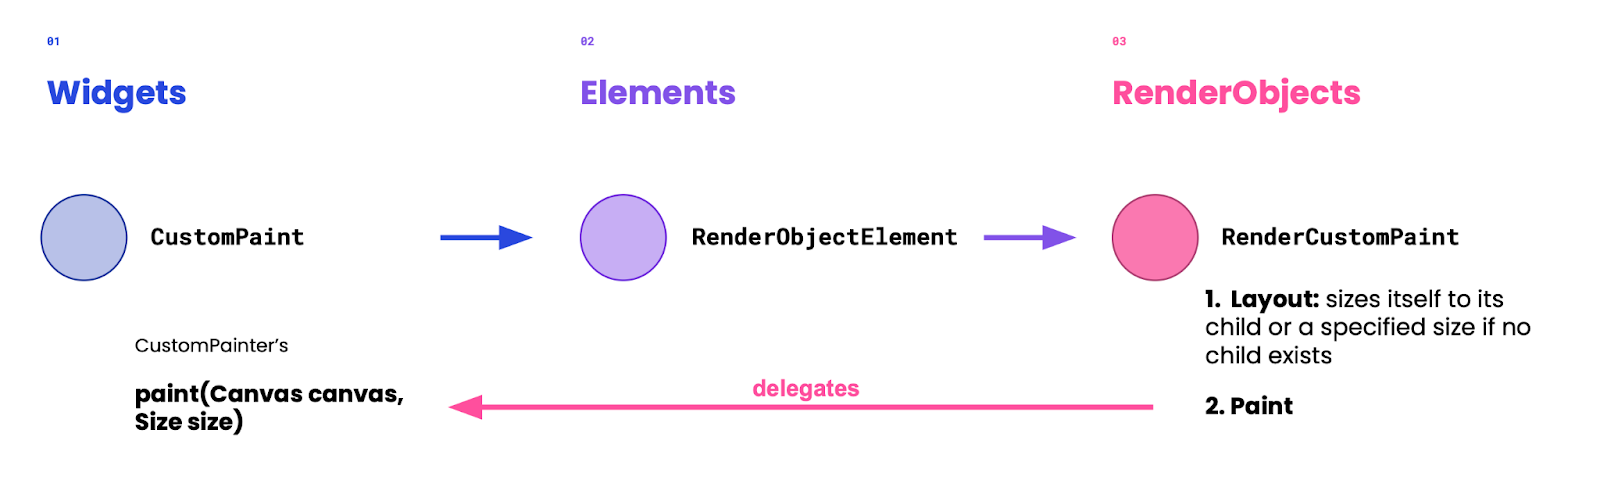
When you use a CustomPaint widget, Flutter creates a RenderCustomPaint object. During the paint phase, instead of painting directly, it delegates the job to your CustomPainter. Essentially, Flutter hands you the canvas and says you draw what goes here. You aren’t breaking the pipeline; you’re plugging directly into it.
Meet the CustomPainter
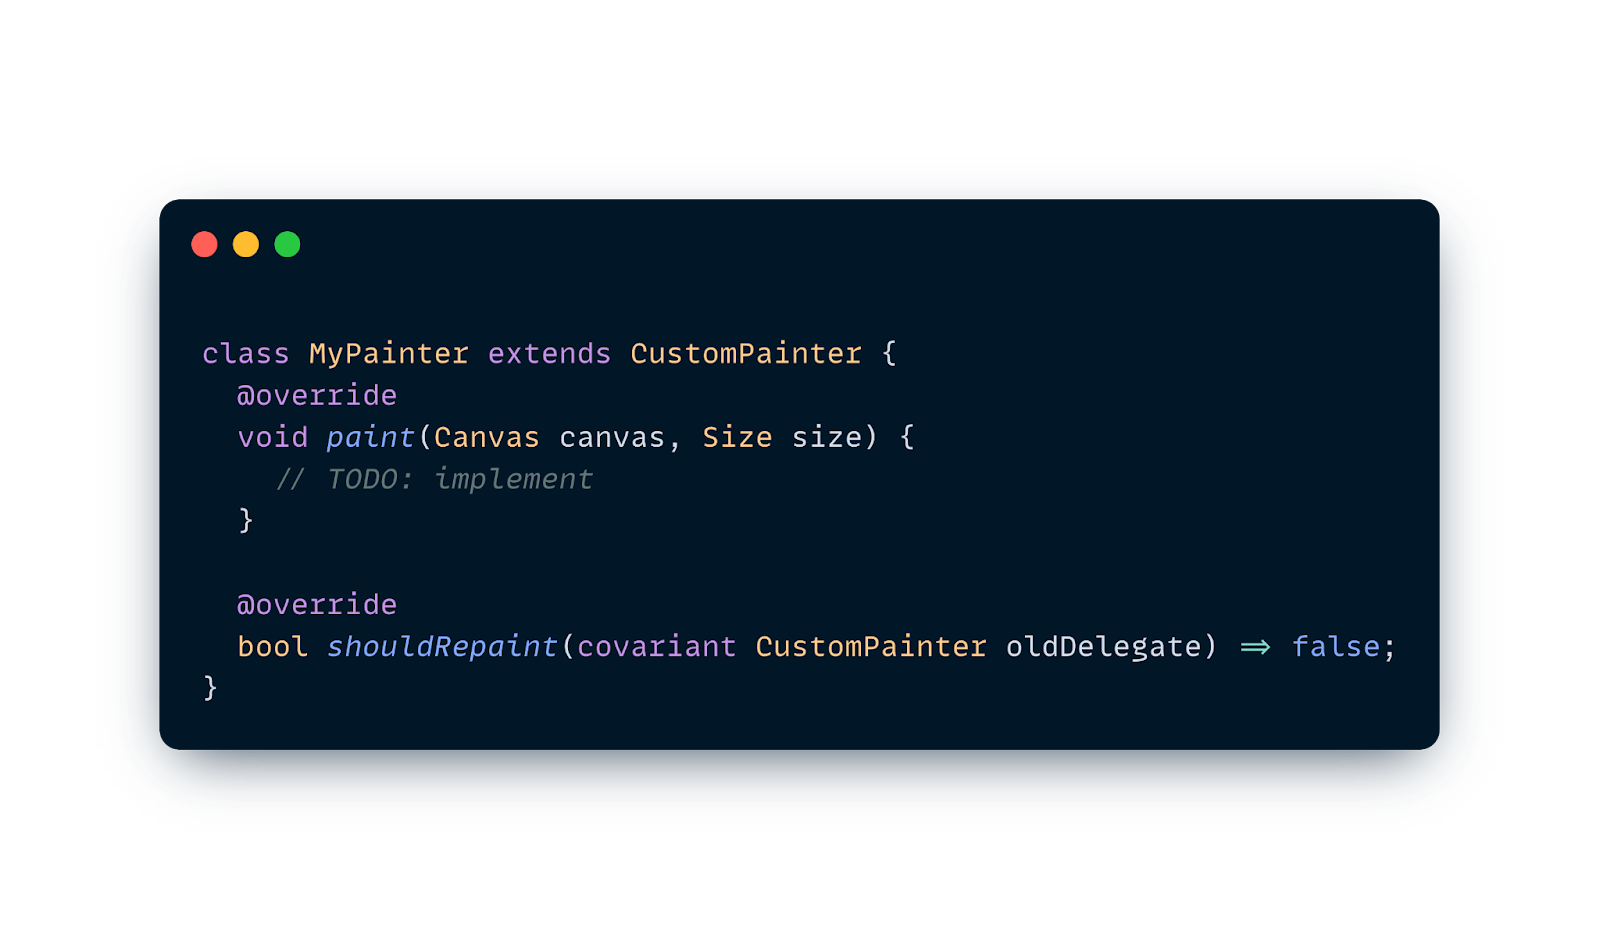
CustomPainter is an abstract class that gives you direct control over a Canvas. To use it, you extend the class and implement two main methods:
1. paint(Canvas canvas, Size size)
This is where the magic happens. You receive a Canvas (your drawing surface) and a Size (the drawing area).
2. shouldRepaint (CustomPainter oldDelegate)
This is critical for performance. It tells Flutter whether the canvas needs to be redrawn when the widget rebuilds. If nothing visual has changed, returning false saves resources.
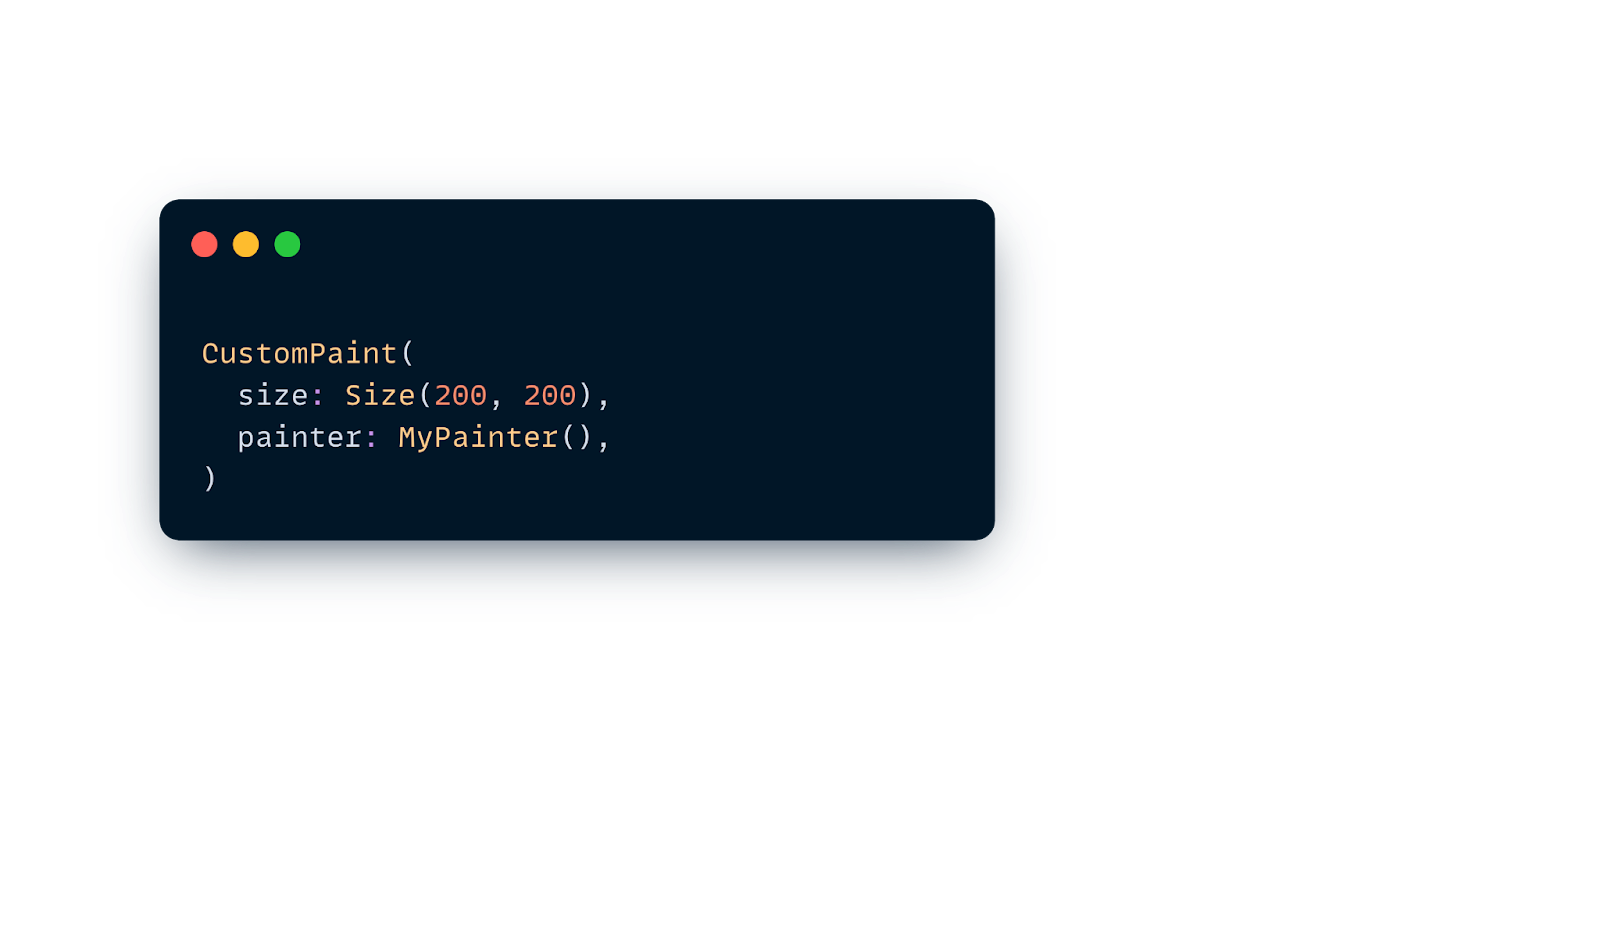
Once defined, you plug it into the widget tree using a CustomPaint widget:
Adding Interactivity & Accessibility
Beyond drawing, you can override optional methods to make your painter interactive and accessible:
hitTest(Offset position): By default,CustomPainterignores taps. Overriding this lets you detect if a user’s touch hits a specific drawn shape or icon.semanticsBuilder: This getter allows you to return a list ofCustomPainterSemantics, describing parts of your drawing (like a chart or progress ring) so screen readers can announce them properly.shouldRebuildSemantics(oldDelegate): Similar toshouldRepaint, this tells Flutter when the semantic description has changed and needs an update.
The Canvas API
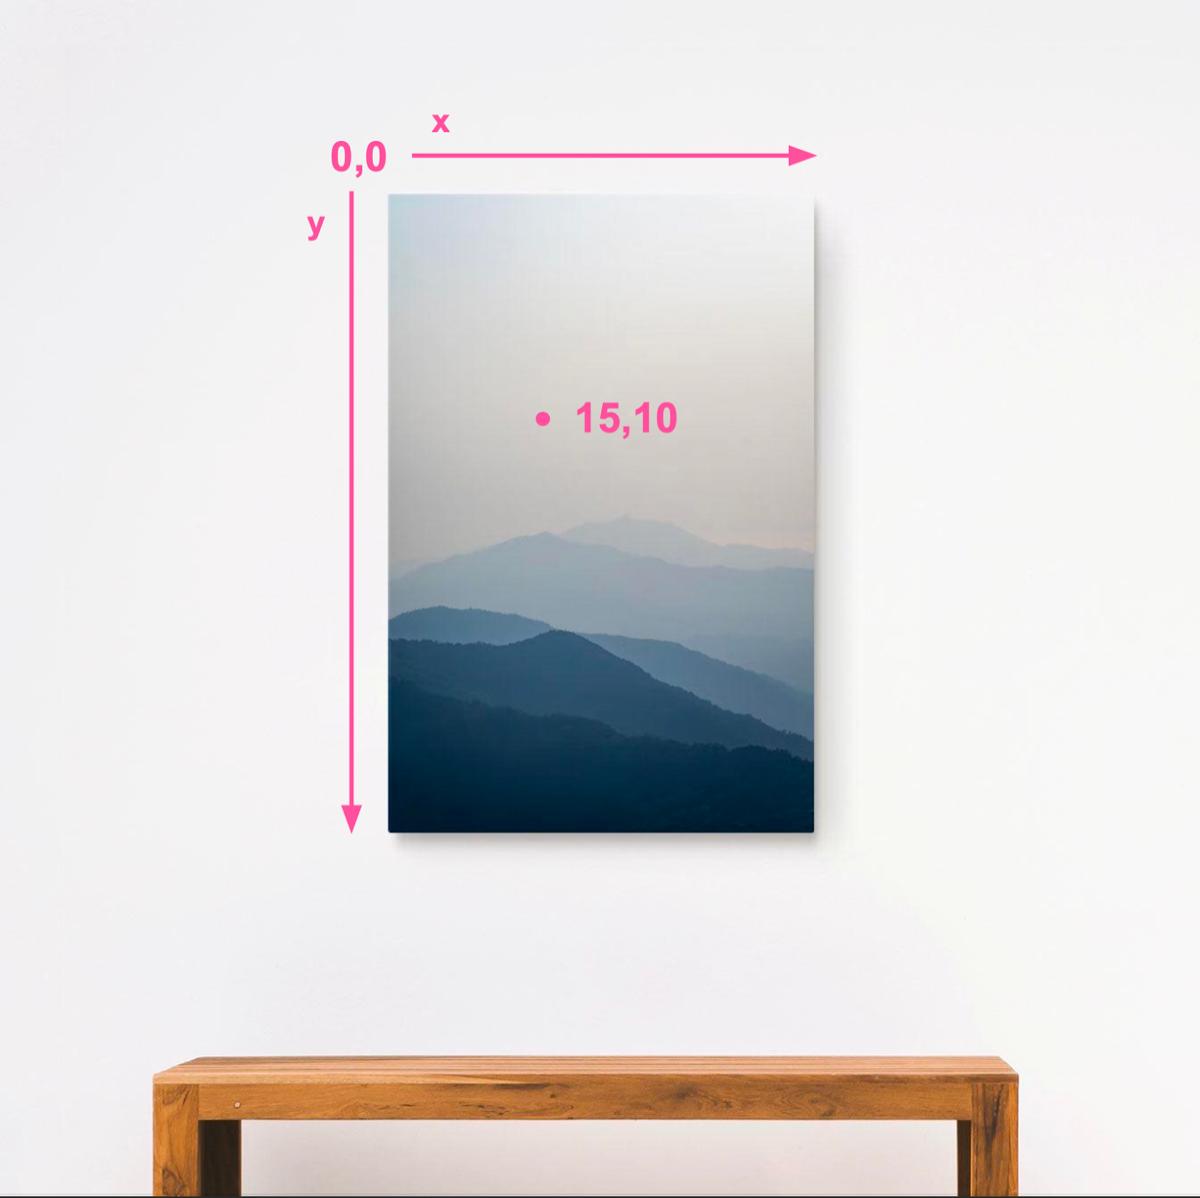
Now let’s talk about the Canvas itself, which is provided as a parameter inside the paint method. Think of the Canvas as a literal drawing surface or a blank digital piece of paper— it’s the interface you use to issue drawing commands to the GPU.
The coordinate system starts at (0,0) in the top-left corner.
- X increases as you move right.
- Y increases as you move down.
Drawing operations work in layers, just like stacking sheets of paper. The order in which you write your code determines the order in which shapes are drawn—what you write first ends up in the background.
Take the example below:
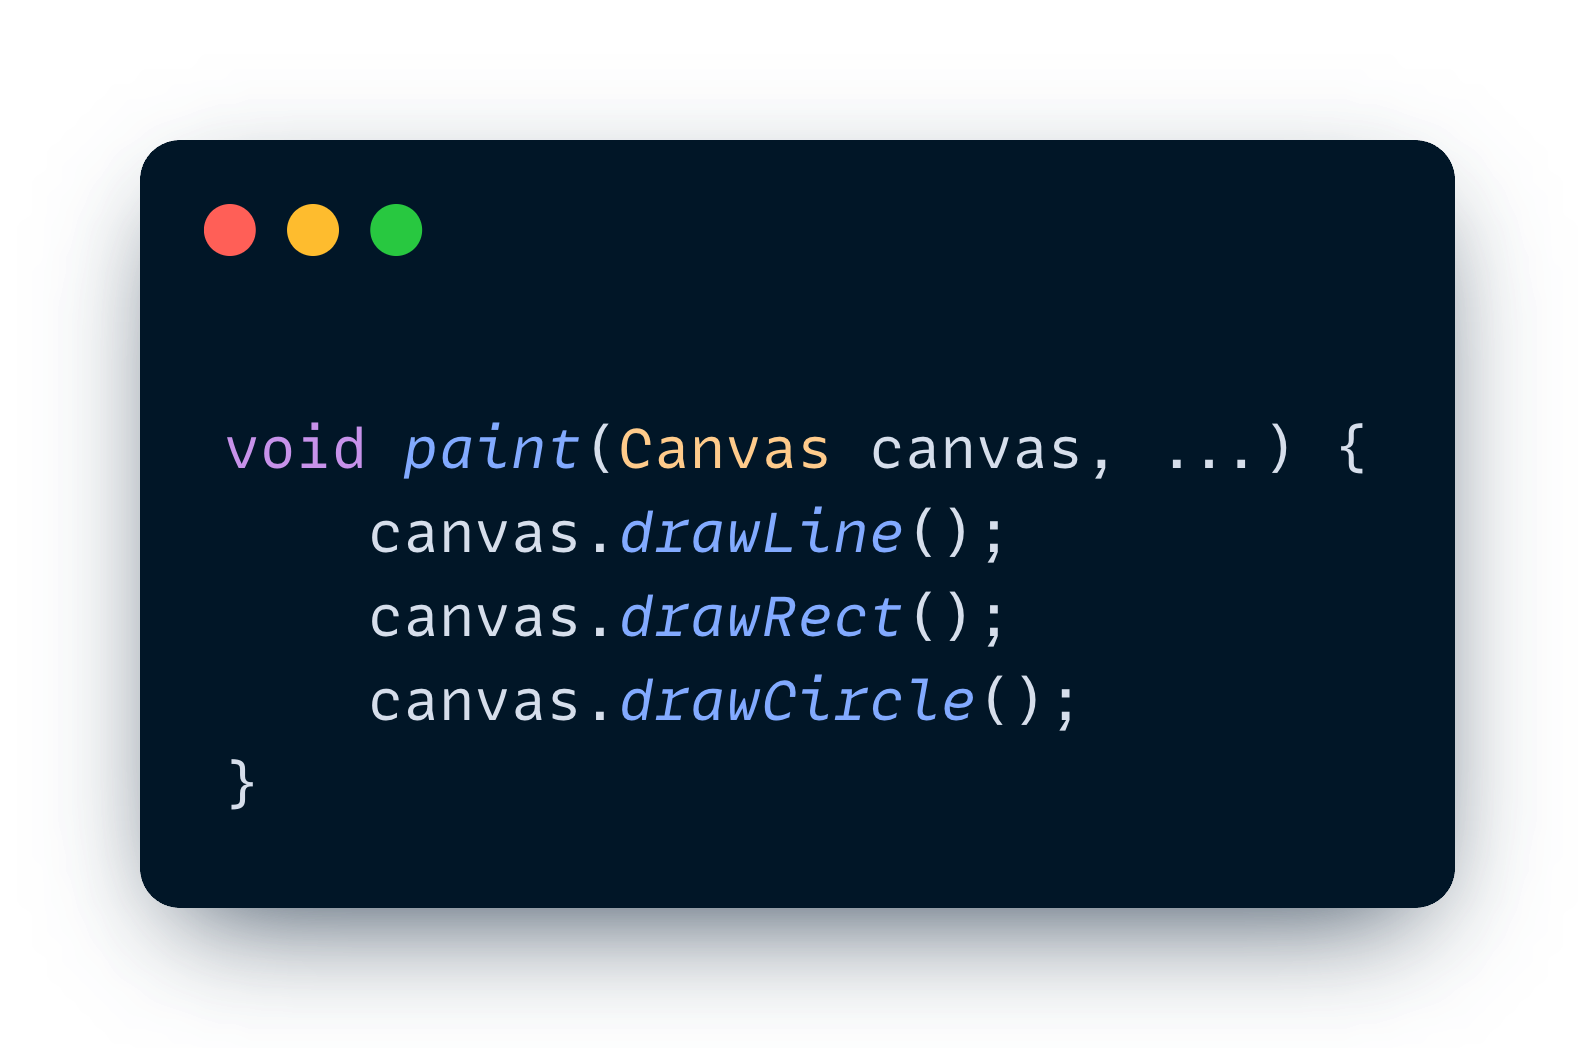
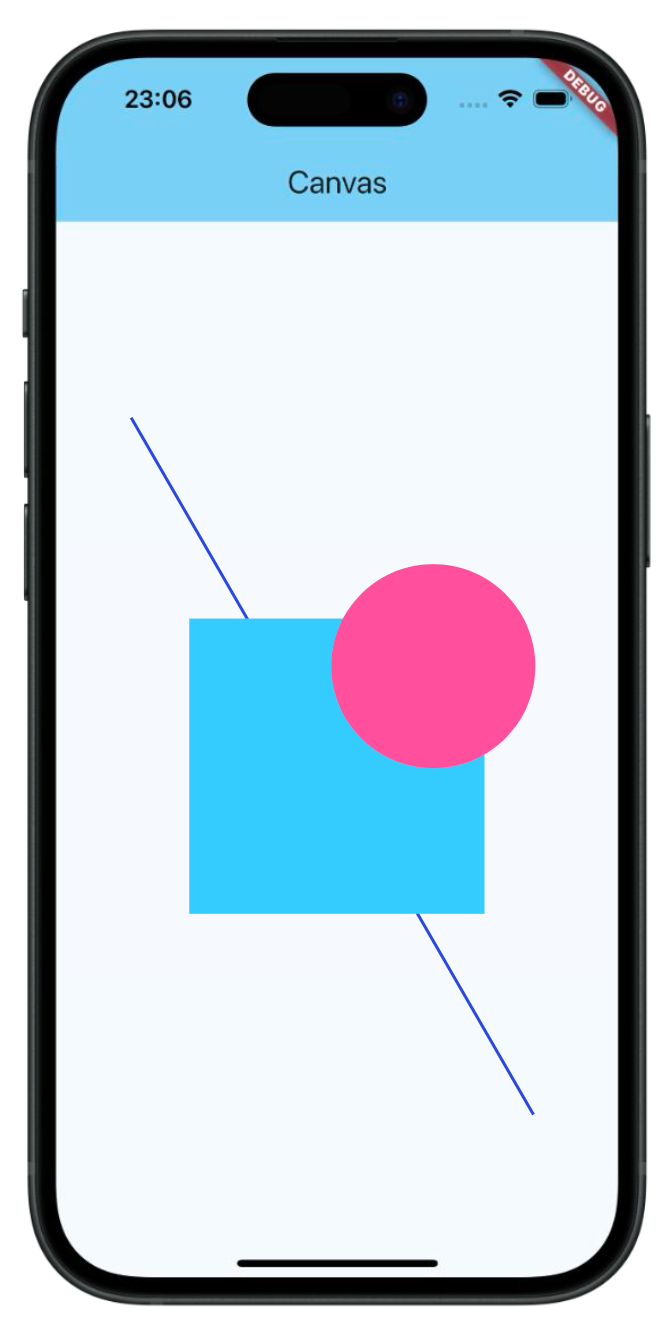
The API provides methods for basic shapes (drawRect, drawCircle,etc), text (drawParagraph), vertices (drawVertices), and images (drawImageRect). However, the most versatile tool in our arsenal is Paths.
Deep Dive: Paths & SVGs
A Path in Flutter is very similar to an SVG (Scalable Vector Graphics) path. Both use commands to define shapes.
If you look at the raw code of an SVG, you’ll often see a <path> tag with a d attribute containing a string of letters and numbers. This <path> tag is the equivalent to the drawPath method in Flutter—it’s the instruction manual for drawing a complex shape.

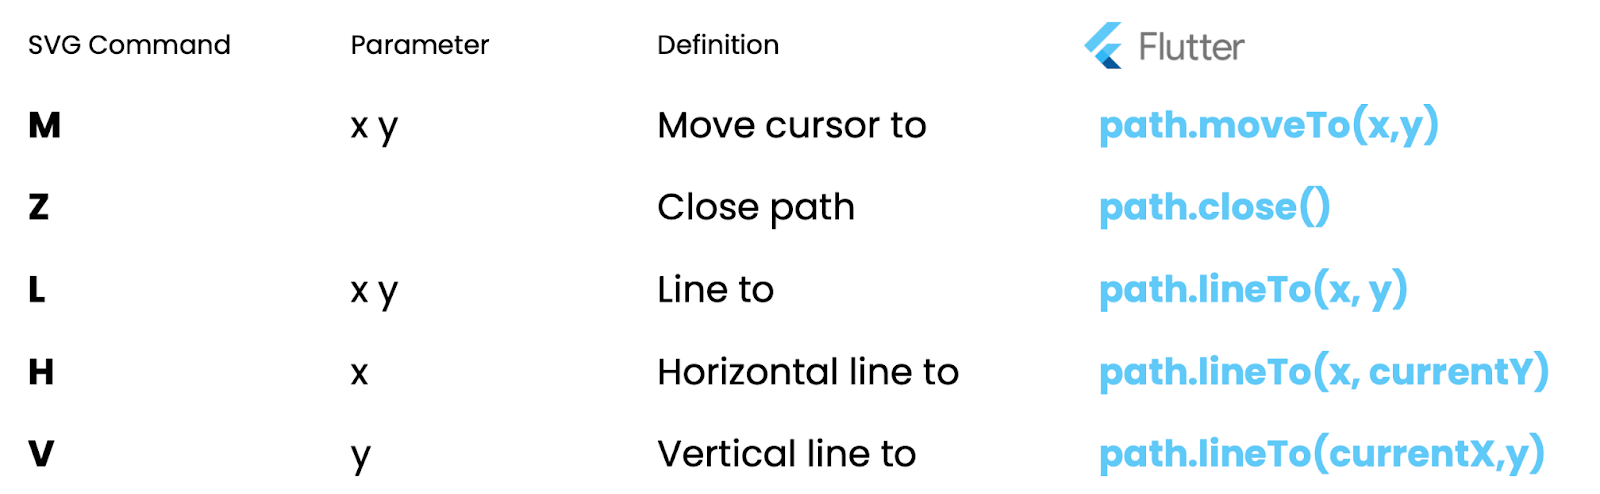
Command Translation Table
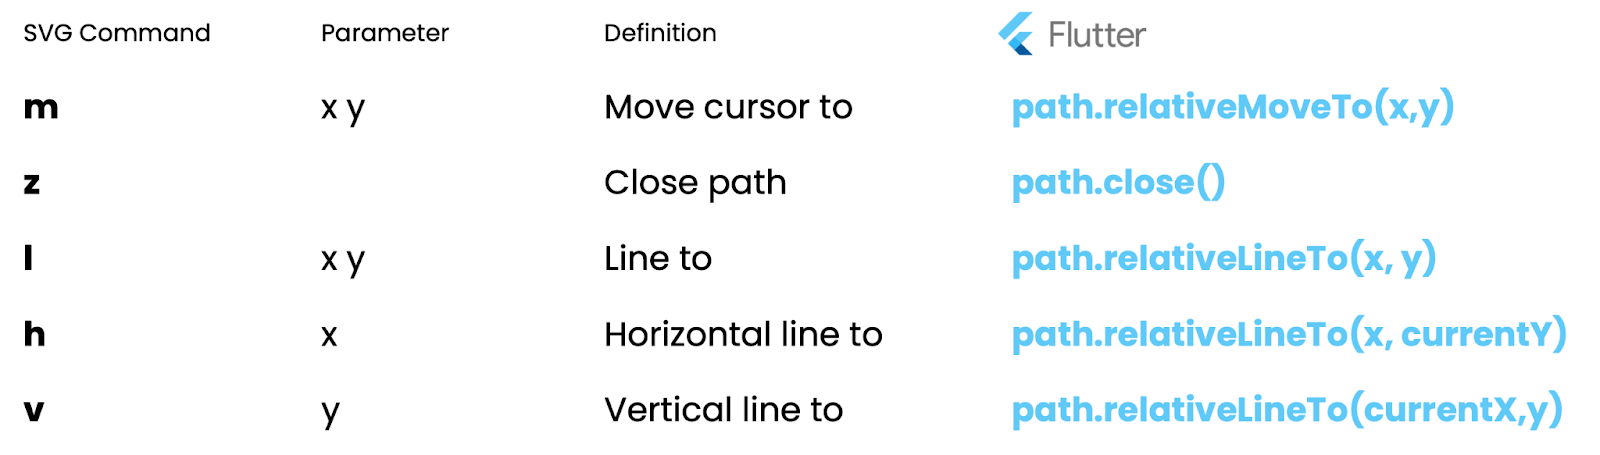
SVG also supports relative commands (lowercase letters like m, l, c), which calculate positions relative to the last point rather than the (0,0) origin. Flutter handles these with “relative” method counterparts:
Putting It Together: A Real Translation
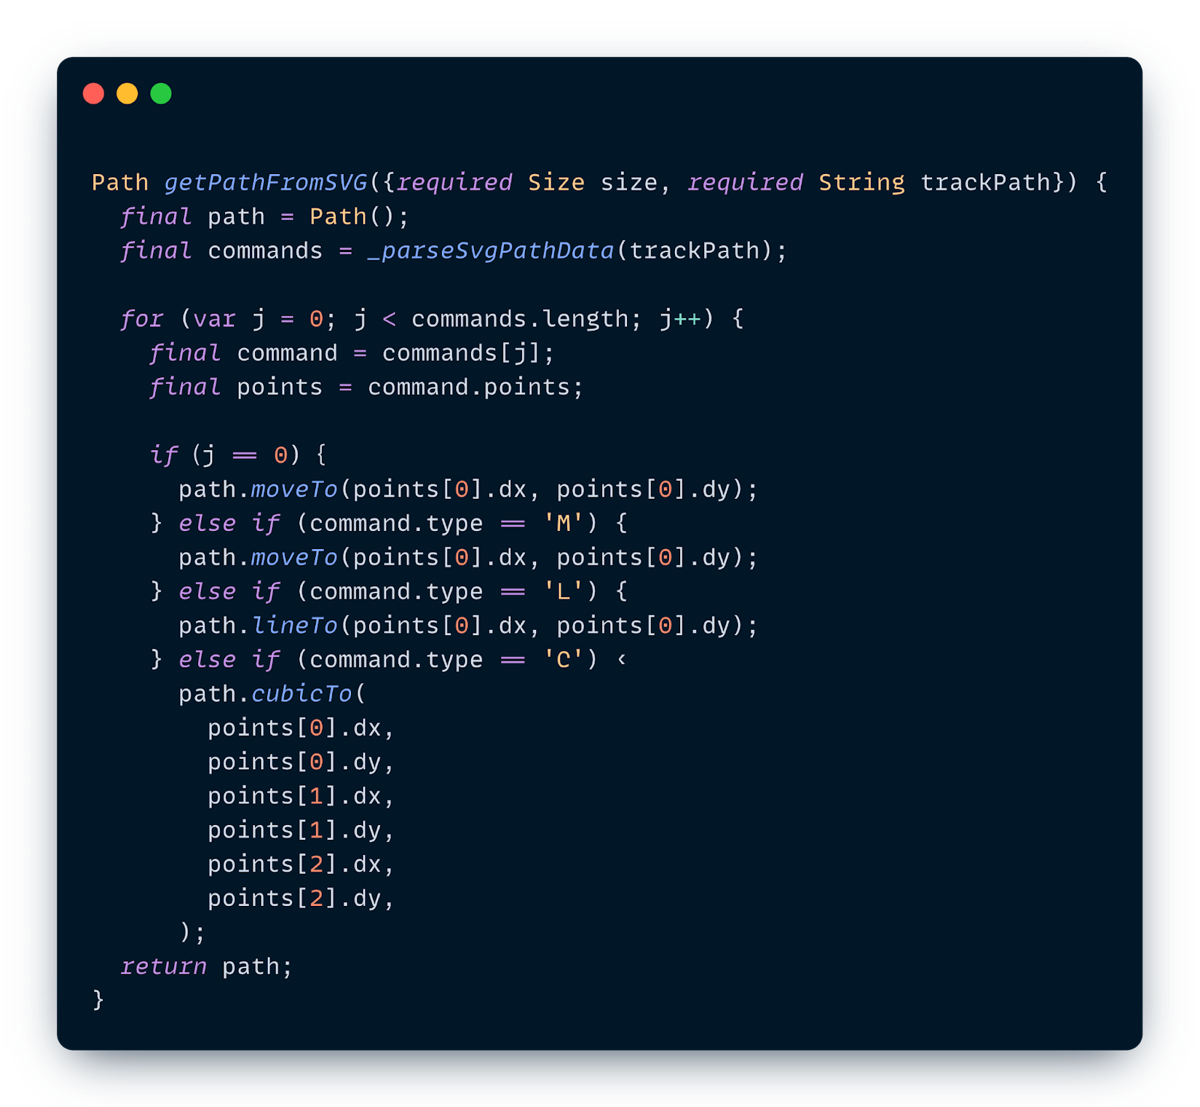
To visualize this, let’s look at a concrete example. In the SVG code below, the path definition (d) starts with an M followed by four C commands.
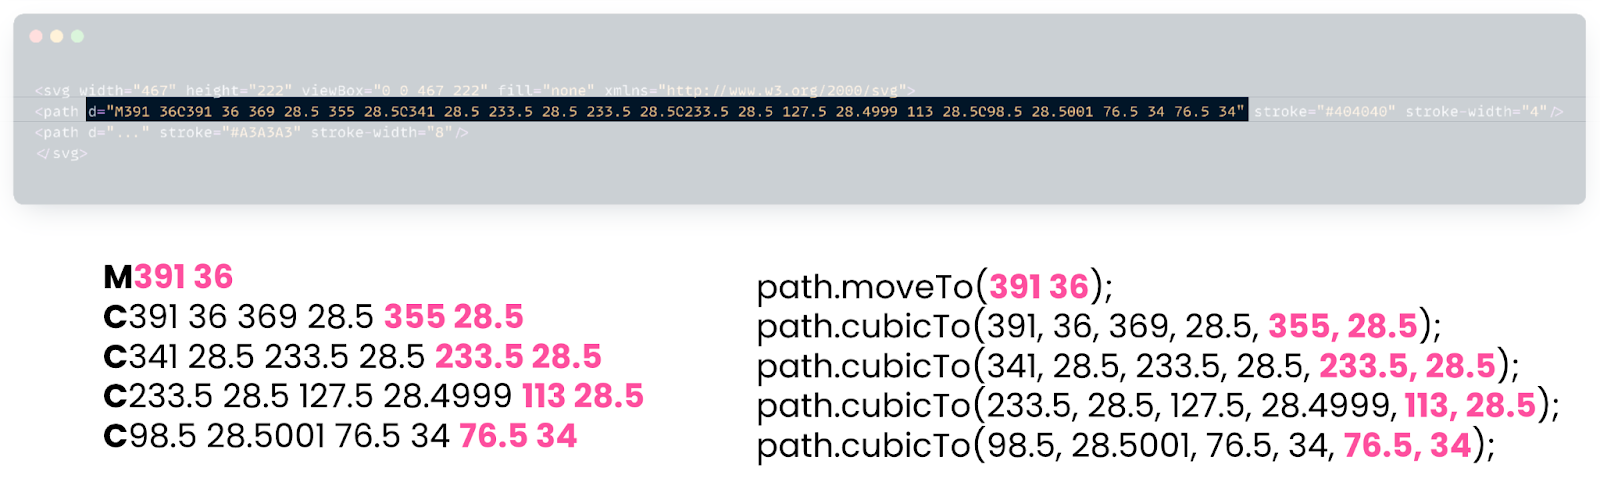
To translate this into Flutter, we simply map each command one by one. The initial M becomes a path.moveTo(391, 36) to set the starting point. Then, for every C that follows, we add a path.cubicTo(…), passing in the six coordinates required for the two control points and the final destination point. By strictly following this pattern, we can replicate the exact same curve on our Flutter canvas.
Parsing SVGs to Flutter Paths
Why not just use flutter_svg? If you only need to display an image, flutter_svg is perfect. It converts SVG geometry into optimized binary drawing commands for rendering.
However, if you need to manipulate the path—like animating a car along a racetrack—you need the actual Path object. You can parse SVG data manually or use packages like path_drawing to translate SVG commands into Flutter path commands (moveTo, lineTo, cubicTo).
Case Study: Trackhouse Racing
At Very Good Ventures, we built an app for Trackhouse, a NASCAR team. The challenge? Visualize race car positions on a track map in real-time.
The backend sends an SVG path of the track for that specific weekend. We have to:
- Parse the SVG into a Flutter
Path. - Draw the track and the pit lane.
- Animate the cars moving along that path based on real-time data.
So first, before we can do any cool animations, we need to translate the SVG string from the backend into a Flutter Path. For this, we have two different approaches:
Approach 1: The Manual Parser
To really understand how this works, let’s look at how we might solve this manually. This was our initial approach to understand the data structure.
We can take the d attribute string (the path definition) and use Regex to split it into individual commands and coordinates. Then, we loop through them and map them to Flutter methods one by one:
This works, and it’s a great way to learn, but it can be brittle and hard to maintain as path complexity grows.
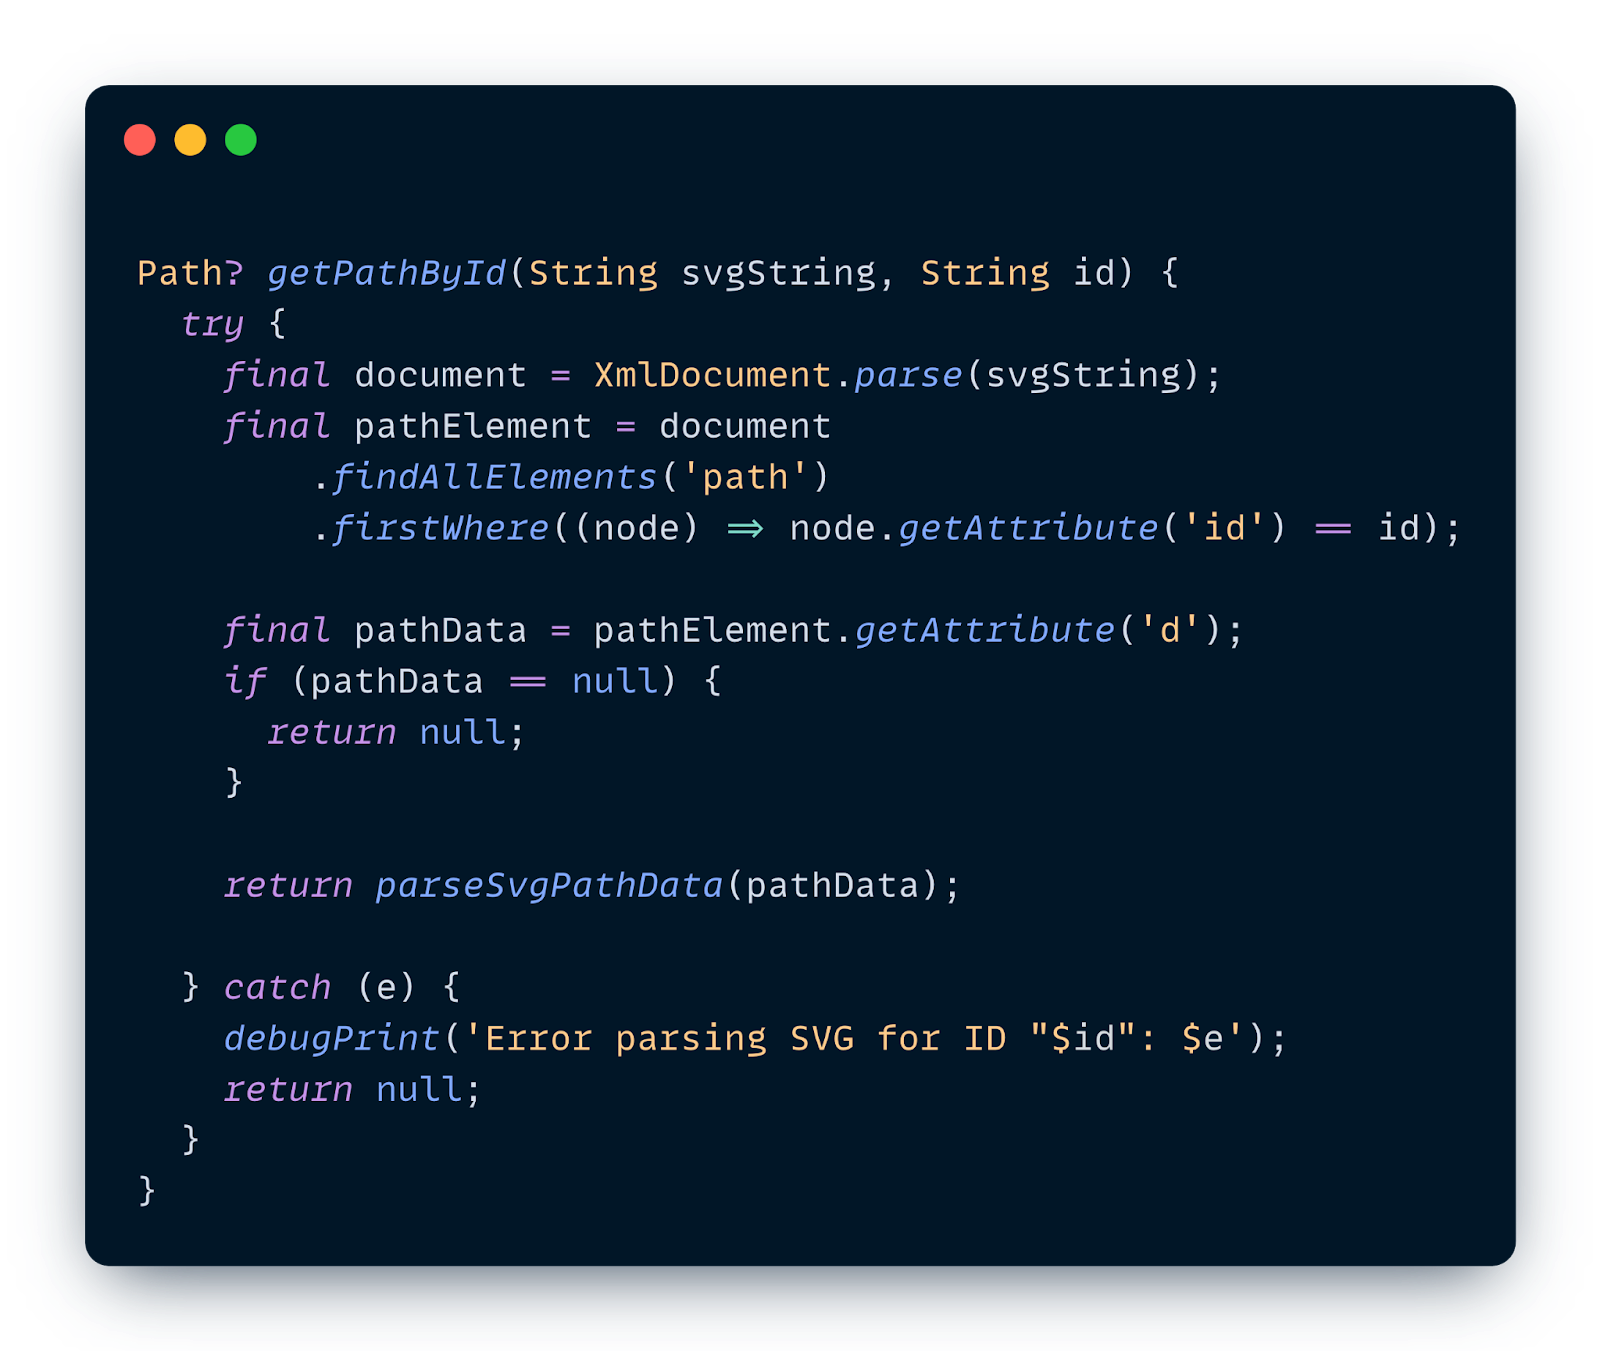
Approach 2: The Parsing Combo (xml + path_drawing)
For the production app, we streamlined this by combining two powerful packages:
xml: We use this to parse the raw SVG string and navigate the XML tree. We search for the specific<path>element we need (e.g., filtering by an ID like “track” or “pit_stop”) and extract its d attribute.path_drawing: This package does the heavy lifting of translating that d string (the sequence ofM,L,Ccommands) into a native Flutter Path object using itsparseSvgPathData()method.
Bringing the Track to Life
Once we have our parsed path, we need to actually render it. In CustomPainter, we manage style using Paint objects. For this track map, we define separate paints for each element to control colors, stroke widths, and styles:
trackPaint:A thick stroke for the main track.pitStopPaint:A thinner stroke for the pit lane.pilotPaint:A fill paint for the car markers.
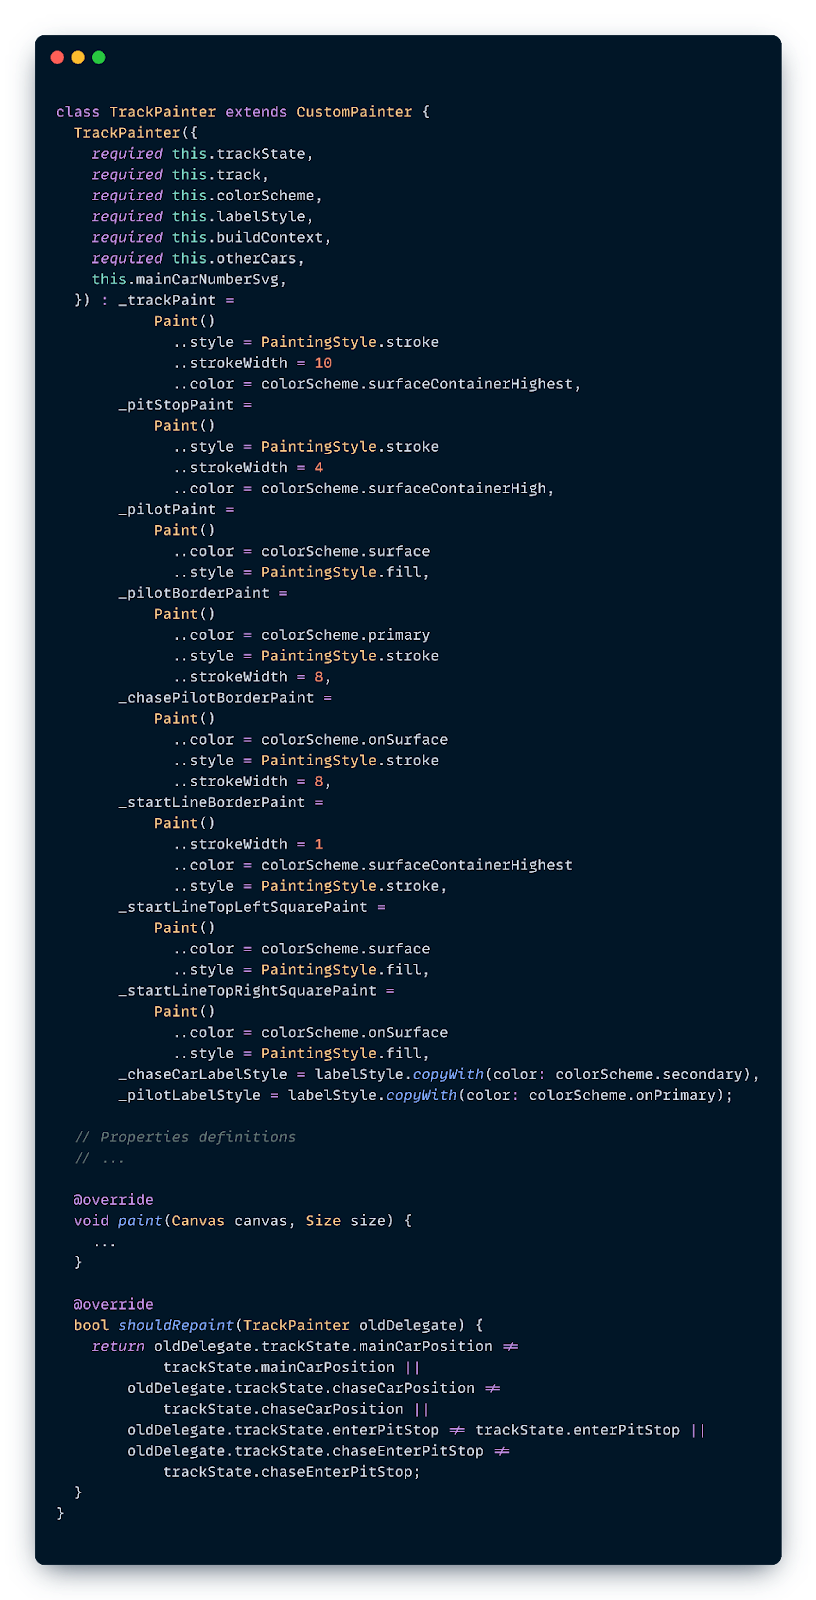
In the paint() method, we draw these elements in layers from back to front. Since the cars need to appear on top of the track, we draw the track first:
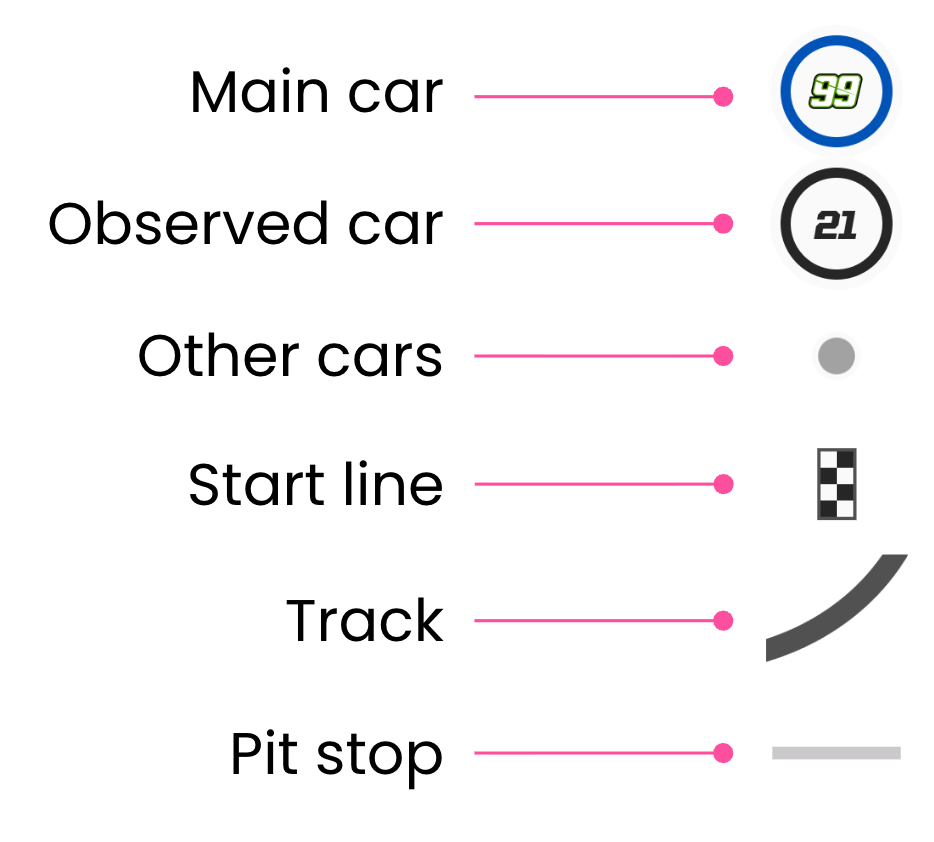
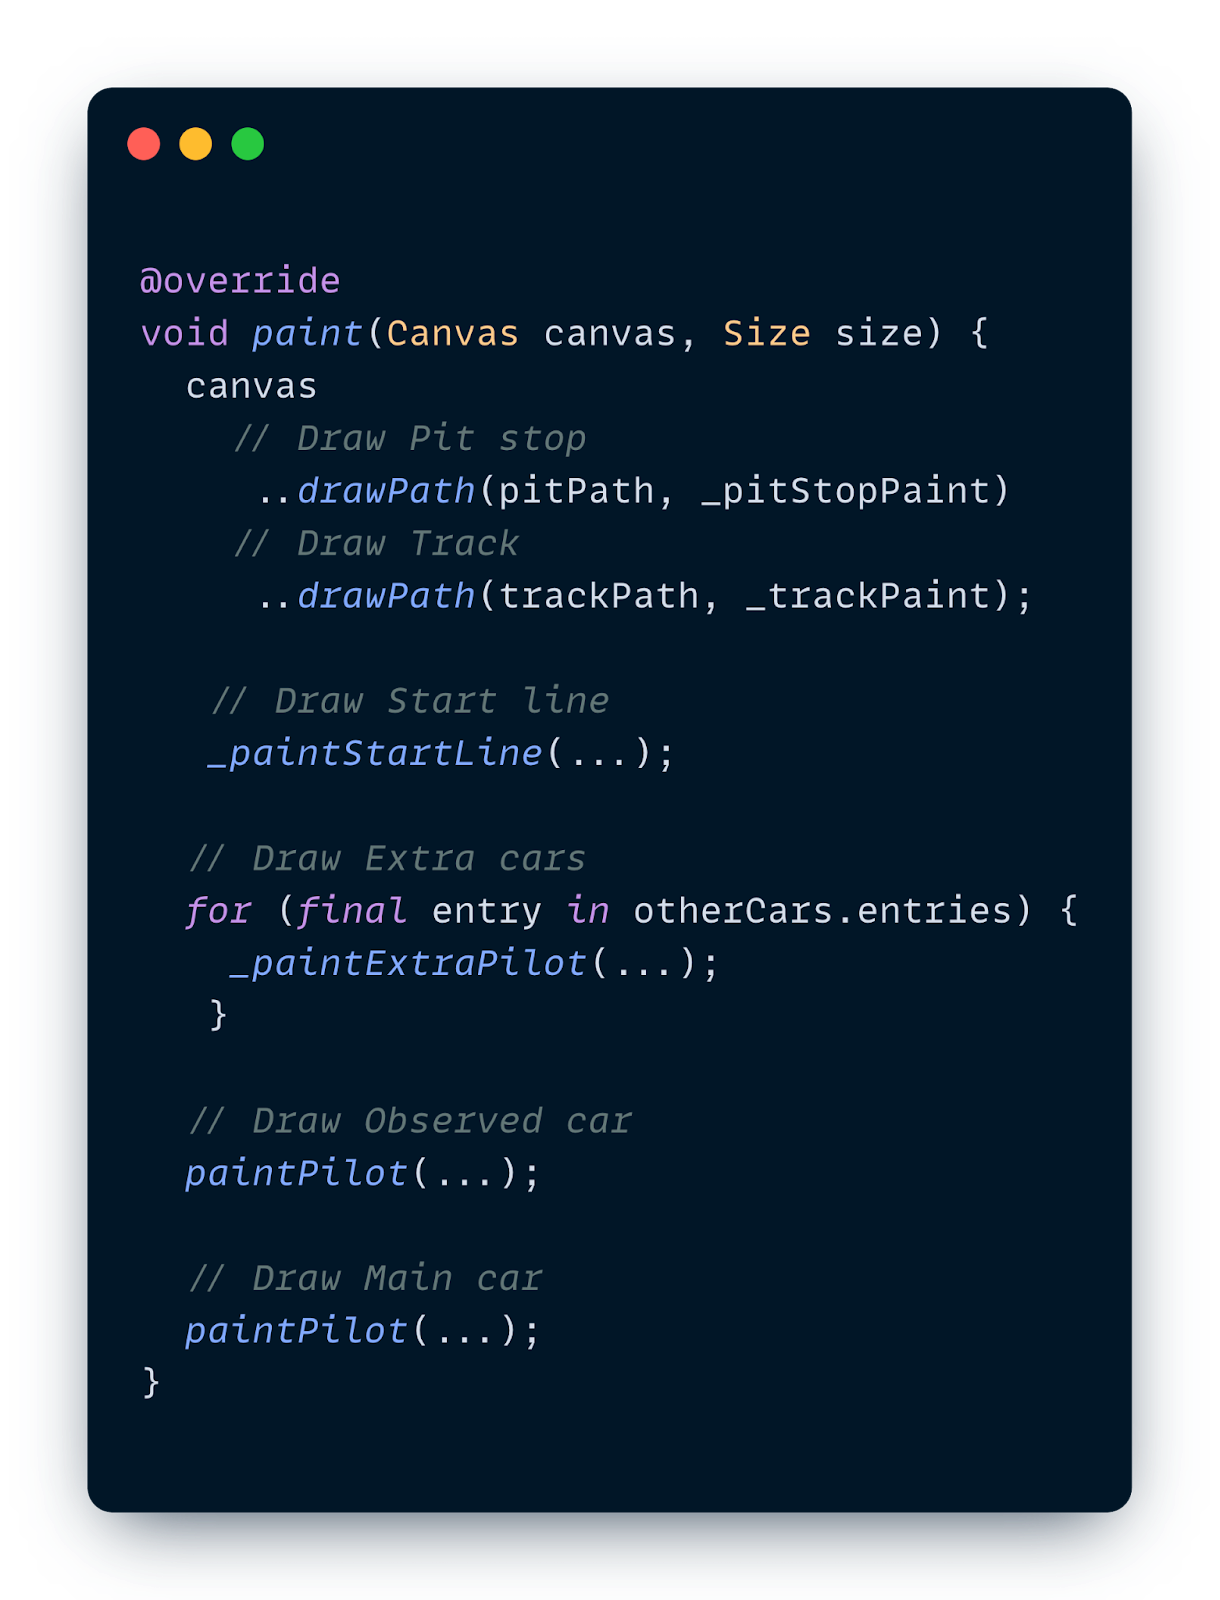
Now, let’s look at two specific examples of how we draw these components: the start line (which is static but oriented) and the cars (which are dynamic and moving).
Example 1: Painting the Start Line
The start line isn’t just a rectangle; it needs to sit perfectly perpendicular to the track at the starting point. But the track curves and turns, so “perpendicular” changes depending on where the start is.
Instead of doing complex math to rotate every square of the checkered flag individually, we can rotate the entire canvas.
- Find the Start: We get the track’s starting position and direction (tangent) using
computeMetrics. - Orient the Canvas: We translate the canvas to that start point and rotate it to match the track’s direction.
- Draw Simply: Now that the canvas is aligned, we can just draw simple vertical rectangles for the black and white checks.

Example 2: The Magic of computeMetrics for Cars
How do we draw a car at exactly 60% of the track? We use Path.computeMetrics().
computeMetrics returns an iterable of PathMetric objects, which allow us to measure the length of the path and find specific coordinates.
Here’s how we place the car:
- Calculate Total Length: Sum the length of all path metrics.
- Determine Distance: If the car is at 60%, the distance is
totalLength * 0.6. - Find the Tangent: Use
getTangentForOffset(distance)to get the (x,y) coordinate and the angle (direction) of the track at that point.
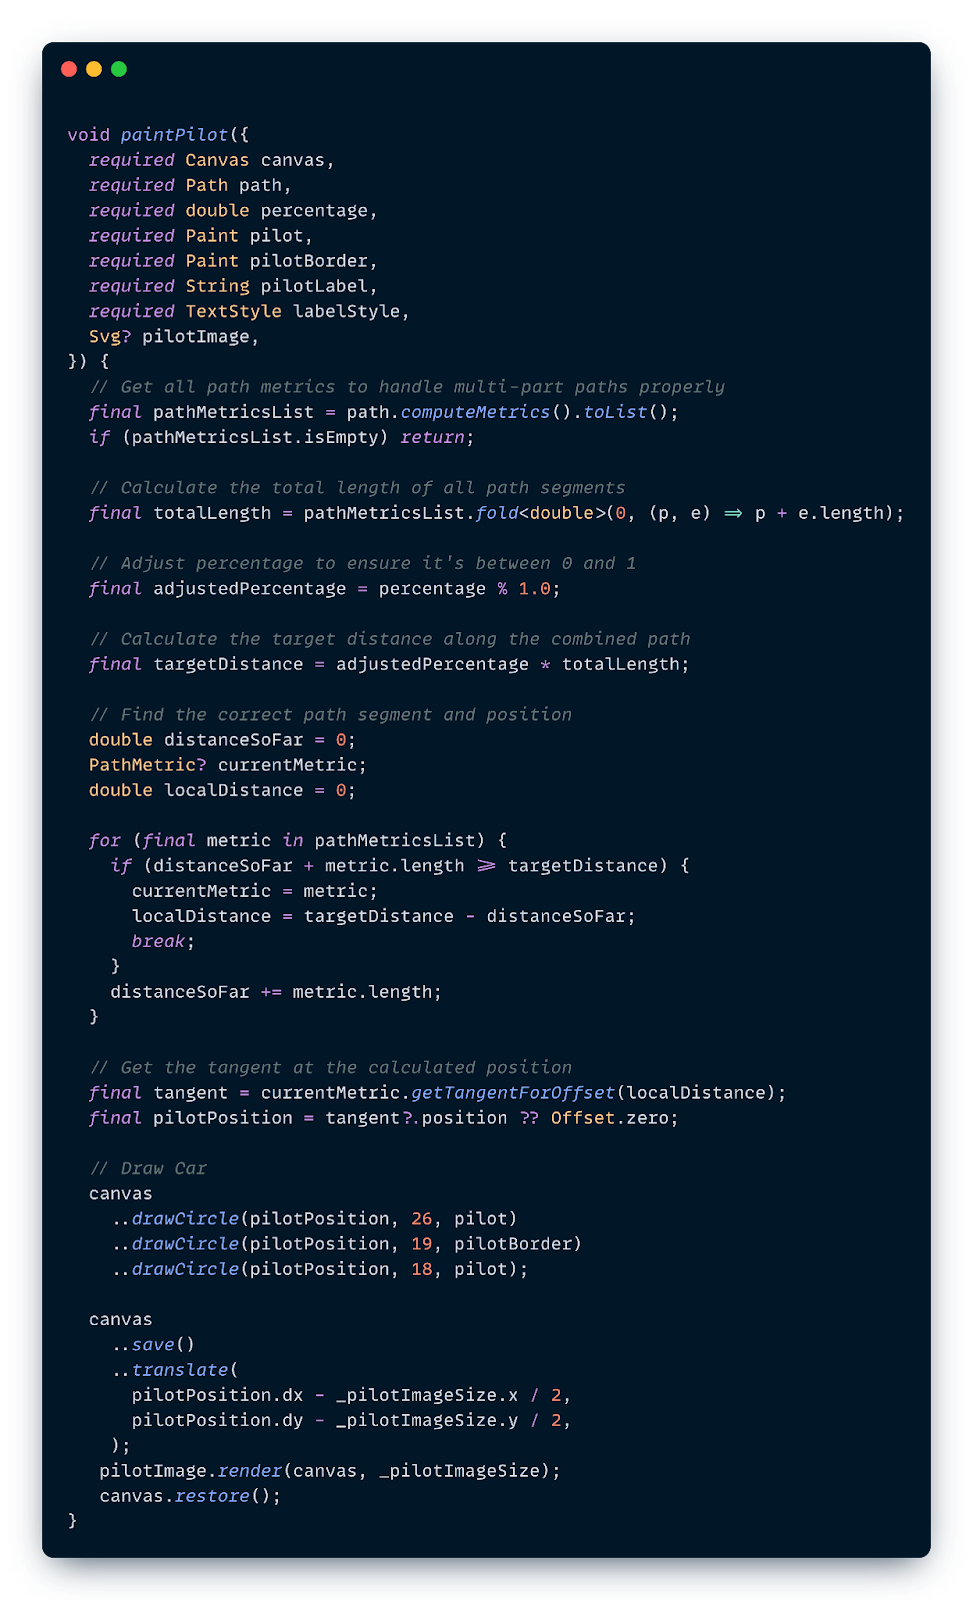
This allows us to animate cars smoothly along complex Bézier curves without doing the heavy math ourselves–Flutter does it for us!
**Performance Optimization **
When working with CustomPainter, performance is paramount:
- Use Layers: The
Canvascreates layers. Usesave() before transforming (rotating/scaling) andrestore() afterwards to isolate changes. - Manage Rebuilds: If your painter relies on an animation, pass the
Listenable(like anAnimationController) to therepaintargument of theCustomPainterconstructor. This triggers only the paint phase, skipping the widget rebuild. - Complex Metrics: Calculating path metrics can be expensive. If the path doesn’t change, calculate metrics once and cache them, rather than re-calculating inside
paint()every frame.
Conclusion
CustomPainter might seem intimidating at first, but it’s just a direct line to Flutter’s rendering engine. By understanding how to manipulate Paths and leveraging tools like computeMetrics, you can build highly custom, performant, and dynamic UIs that standard widgets just can’t handle.
So next time a designer hands you an “impossible” design, you know what to do.
Watch the Talk
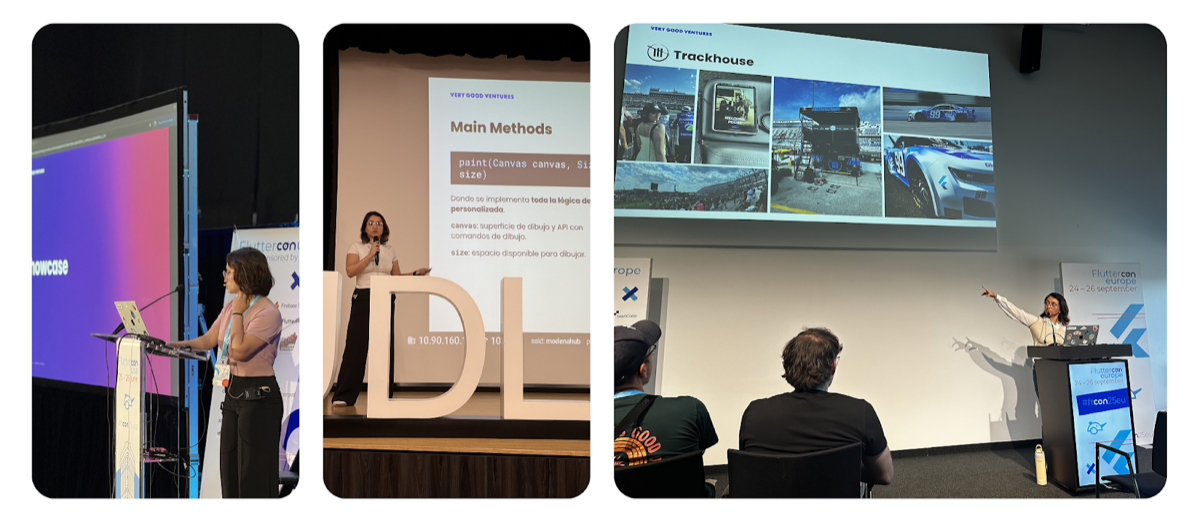
I had the opportunity to present this topic deep dive at several conferences around the world, including Fluttercon USA in New York City, Flutterconf Latam in Quito, and Fluttercon EU in Berlin. If you want to hear more details, you can check out the recordings below:


